Intro
I recently received six Aerohive HiveAP120 from a friend.
When trying to configure them, I rapidly discovered that the AP’s interface was rather poor: The only options allow to set the device’s IP adress statically or by dhcp, to enter the hivemanager’s address, and to upgrade firmware. Nothing else.
What I wanted, was the Access points to broadcast two disctinct SSID, each of them being a different network. I also wanted to have some roaming capabilities, as a client should not get disconnected when a person is through the building, hopping from one AP to the other (this is where the hive comes in play).
I configured my firewall to set two vlans in one trunk, and connect the AP’s on this trunks, services are managed by firewall (dhcp, dns, ntp), the AP’s only transiting the packets (not routing).
This left me with two options: either pay the license, or find a way through the Command Line Interface (CLI)… I went for the CLI!
As expected, it took a bit of trial and error, here is however what worked for me.
First of all, this guide might (or not) apply to other models/versions: proceed at your own risk.
The software version running on my AP’s is:
Version: HiveOS 6.2r1c release build1943
Build time: Thu Mar 26 10:12:09 UTC 2015
Build cookie: 20150326-5012
Platform: HiveAP120 Bootloader ver: v1.0.5.27
TPM ver: v1.2.17.3
Procedure
Additionally, to perform this setup, I use one power bloc and 2 network cables. The power bloc is because at one moment of the setup, we need to switch cables to save the config, and POE does not like that. The first network cable has a simple, untagged network with a DHCP server. The second cable has 3 tagged vlans inside: vlan30, vlan31 and vlan32 in this example. vlan 30 and 31 each carry one of my wifi networks, while 32 carries the AP management interfaces. First we’ll dig through the used options:
- change your admin login and password (replace newadminlogin and newadminpassword)
admin root-admin newadminlogin password newadminpassword
- Make the leds dimmer
system led brightness dim
- Disable centralised Hivemanager capwap
no capwap client enable
- We define a security object: first the name of the object, then the encryption algo and key, finally the attribute for vlan
security-object Wifi1
security-object Wifi1 security protocol-suite wpa2-aes-psk ascii-key “One of your networks_PSK”
security-object Wifi1 default-user-profile-attr 30 - We define a second security object like we did for the first one
security-object Wifi2
security-object Wifi2 security protocol-suite wpa2-aes-psk ascii-key “the other network’s PSK”
security-object Wifi2 default-user-profile-attr 31 - We define an SSID, and attach a security object to it (I used matching names for security objects and SSID’s, but it is not compulsary)
ssid Wifi1
ssid Wifi1 security-object Wifi1 - We define our second SSID and attach our second security object to it.
ssid Wifi2
ssid Wifi2 security-object Wifi2 - We define that our AP’s should work as a Hive (communicate together)
Our hive will be called Wifi-Hive, and password will be A-strong-hive-passwordhive Wifi-Hive
hive Wifi-Hive password A-strong-hive-assword - Now we assign SSID’s to our wifi antennas, this is tricky:
#Note that on one side, we use wifi0.1 and wifi0.2 (Wifi0 is the 2.4Ghz Antenna)
#And on the other side, we use wifi1.2 and wifi1.3 (Wifi1 the the 5Ghz Antenna)
#This is because wifi1 is in “dual mode” and Wifi1.1 used as “backhaul”interface wifi0.1 ssid Wifi1 interface wifi1.2 ssid Wifi1
interface wifi0.2 ssid Wifi2
interface wifi1.3 ssid Wifi2 - We set the hive’s management interface
interface mgt0 hive Wifi-Hive
- QOS defines which vlan correspond to which attributes (Here I used matching numbers between vlan and attribute for simplicity)
user-profile Wifi1 qos-policy def-user-qos vlan-id 30 attribute 30
user-profile Wifi2 qos-policy def-user-qos vlan-id 31 attribute 31 - Force wifi1 to use a specific channel
#This is important, as wifi1.1 is our backhaul… While all AP’s are on the same frequency, they can establish the hive.
#Note that you can very well use a different channel than 44interface wifi1 radio channel 44
- Define this AP’s name: This is the only line that changes between the conf of all my AP’s
hostname WifetteHive-AP1
- and save the changes we just pushed.
save config
- Now that the base config has been written in the AP, there are two more lines we need to set so that we will be able to contact the device’s management interface:
This will be where we need to switch cables and rely on the power blockinterface mgt0 vlan 32 interface mgt0 ip 10.11.12.2 255.255.255.0
The procedure to push this conf is simple:
– AP should be connected to a network with working dhcp.
– Power on the AP.
– Perform a hard reset: once it is powered on well, insert a small pin into the reset hole. The light will slightly blink a few times, and then stay blue.
– Let the AP boot again until light is green.
– Once the light is green, find the IP of the AP. I used nmap for this: as root:#nmap -sP 172.28.200.1-254
I use root for this as access to the MAC tells you which device it isJuPiTeR ~ # nmap -sP 172.28.200.1-254
Host is up (0.00057s latency).
MAC Address: 00:19:77:00:00:00 (Aerohive Networks)
Nmap scan report for 172.28.200.92
Host is up (0.00058s latency).
MAC Address: 00:19:77:00:00:00 (Aerohive Networks)
Nmap scan report for 172.28.200.93
Host is up (0.00056s latency).
MAC Address: 00:19:77:00:00:00 (Aerohive Networks)
Nmap scan report for 172.28.200.94
Host is up (0.00057s latency).
MAC Address: 00:19:77:00:00:00 (Aerohive Networks) - Once you know the IP, then edit the following conf to fit your needs
(change login/pass, SSID names, PSK, vlan, hive password, …)admin root-admin newadminlogin password newadminpassword
system led brightness dim
no capwap client enable
security-object Wifi1
security-object Wifi1 security protocol-suite wpa2-aes-psk ascii-key “One of your networks_PSK”
security-object Wifi1 default-user-profile-attr 30
security-object Wifi2
security-object Wifi2 security protocol-suite wpa2-aes-psk ascii-key “the other network’s PSK”
security-object Wifi2 default-user-profile-attr 31 ssid Wifi1
ssid Wifi1 security-object Wifi1
ssid Wifi2
ssid Wifi2 security-object Wifi2
hive Wifi-Hive
hive Wifi-Hive password A-strong-hive-assword
interface wifi0.1 ssid Wifi1
interface wifi1.2 ssid Wifi1
interface wifi0.2 ssid Wifi2
interface wifi1.3 ssid Wifi2
interface mgt0 hive Wifi-Hive
user-profile Wifi1 qos-policy def-user-qos vlan-id 30 attribute 30
user-profile Wifi2 qos-policy def-user-qos vlan-id 31 attribute 31
interface wifi1 radio channel 44
hostname WifetteHive-AP1
save config
- Plug in the simple not tagged network cable
- ssh into the device (default login is admin, and default password is aerohive)
- Copy your conf and paste it in the terminal – don’t forget to save config!
- change the management vlan: “interface mgt0 vlan 32” — Your device should look like it froze.
- close that terminal, and switch to the cable carrying tagged vlan32 (there should be a dhcp… find the devices address on that vlan) –> if you don’t use a power block here, you’re screwed… because pulling the wire will reset the device to last saved conf, hence erasing the “interface mgt0 vlan 32”.
- ssh to the device on its new IP,
- optionally, give it a fix IP in the mgt control vlan: “interface mgt0 ip 10.11.12.7 255.255.255.0”
- save config once again.
1: Test your wifi with some device (if it doesn’t work, you did something wrong)Testing your config:
2: Check the conf with ssh, we will test with 4 commands:
$ ssh 172.28.200.94
Aerohive Networks Inc.
Copyright (C) 2006-2015
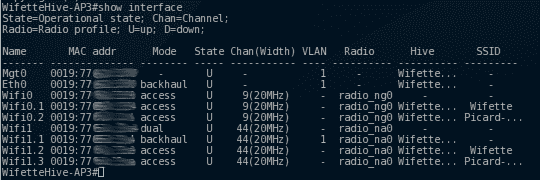
WifetteHive-AP3#show interface aerohive cli show interfaceShow us the interfaces of selected AP. the important things here:
Wifi0 is in access mode, while wifi1 is in dual mode. Dual here means access and backhaul, access being the one for clients, and backhaul the one the AP’s use to communicate between themselves. Here you see why numbers didn’t match in the config’s tricky part:
wifi0.1 –> SSID Wifette (2.4Ghz)
wifi0.2 –> SSID Picard (2.4Ghz)
wifi1.1 –> backhaul
wifi1.2 –> SSID Wifette (5Ghz)
wifi1.3 –> SSID Picard (5Ghz)
WifetteHive-AP3#show station aerohive cli show stationWe can see all clients connected to the different SSID’s of the current AP, in this case, there is one connected to wifi0.1 (thus on wifette in 2.4Ghz as we saw on the previous picture)

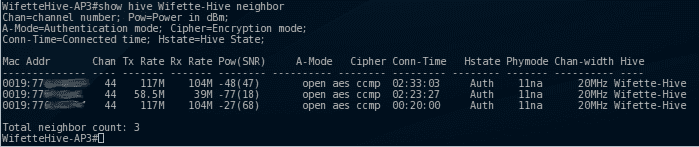
WifetteHive-AP3#show hive Wifette-Hive neighbor In my case, the main objective of the hive, is that all AP’s act as one, and allow customers to roam without disconnection. For this, the hive uses a “roaming cache”…aerohive cli show hive Wifette-Hive neighborHere we can see that the AP’s can see each other… in this case, Wifette-Hive AP3 can see 3 other access points, and they are part of the same hive.
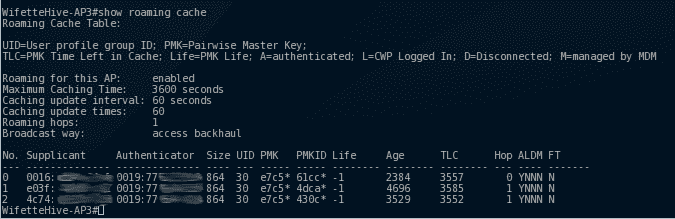
WifetteHive-AP3#show roaming cacheaerohive cli show roaming cacheIn this case, we can see that 3 clients are connected to other access points of the hive. AP3 already has the information about these clients (thanks to the hive), and if client 3 get better signal from AP3 than from the one he is currently connected on, the device will switch from AP transparently.
Conclusion
This covers most of the setup I did with these access points I got for free. I am very happy of the improved coverage quality and vlan separation.
As there are plenty of cheap second hand Aerohive AP’s available on the Internet, this might become my new standard.
I expect to have some trouble if I mix different versions of the Aerohive OS though… time will tell ^^
Sources of inspiration/further readings:
Aerohive deployment guide 1
Aerohive deployment guide 2
Aerohive cli guide